The strategic partnership announced at VMware Explore, joining the forces of VMware by Broadcom and Canonical, opens a new chapter in building and deploying applications in private clouds. The combination of the leading VMware Cloud Foundation (VCF) platform with the most popular cloud operating system, Ubuntu, brings powerful tools to developers and administrators.
The main hero of this collaboration is Chiselled Ubuntu images. In this article, I will guide you through the entire lifecycle of a modern application, from preparing the environment to building and comparing a “chiselled” image with a traditional one, and finally to its deployment and launch as a service on a VMware Tanzu Kubernetes cluster.
Step 1: Preparing the Environment — The Common Foundation
Before you start creating, ensure that your development environment (e.g., an Ubuntu VM) has all the necessary tools.
1.1. Installing Rockcraft
Rockcraft is a tool from Canonical for building OCI images and snap packages. It is the key to creating “chiselled” images.
sudo snap install rockcraft --classic
1.2. Installing and Configuring the Docker Engine
I will use Docker to test, tag, and push the images to a registry.
sudo apt-get update
sudo apt-get install ca-certificates curl

sudo install -m 0755 -d /etc/apt/keyrings
sudo curl -fsSL https://download.docker.com/linux/ubuntu/gpg -o /etc/apt/keyrings/docker.asc
sudo chmod a+r /etc/apt/keyrings/docker.asc

echo \
  "deb [arch=$(dpkg --print-architecture) signed-by=/etc/apt/keyrings/docker.asc] https://download.docker.com/linux/ubuntu \
  $(. /etc/os-release && echo "$VERSION_CODENAME") stable" | \
  sudo tee /etc/apt/sources.list.d/docker.list > /dev/null

sudo apt-get update
sudo apt-get install docker-ce docker-ce-cli containerd.io docker-buildx-plugin docker-compose-plugin

sudo usermod -aG docker $USER
Important: After running usermod, you must log out and log back in, or run newgrp docker for the permission changes to take effect.
Step 2: Building the Images — A Comparative Approach
I will create two images with Python: one “chiselled” and one “traditional,” to show you the tangible difference.
2.1. The “Chiselled” Image
In a directory named python-chiselled, create a file rockcraft.yaml. In it, I will define only the absolute minimum necessary packages.
name: python-chiselled
base: bare
build-base: ubuntu@24.04
version: '3.12'
summary: Chiselled Python container, based on Ubuntu
description: Example of a python container in Ubuntu.
platforms:
  amd64:

parts:
  install-python:
    plugin: nil
    stage-packages:
      - base-files_release-info
      - python3_core
2.2. The “Traditional” (Fat) Image
In a directory named python-fat, create a rockcraft.yaml file with standard dependencies, which pull in many additional packages.
name: python-fat
base: ubuntu@24.04
version: '3.12'
summary: Full Python container, based on Ubuntu
description: This is our image's description.
platforms:
  amd64:

parts:
  my-part:
    plugin: nil
    stage-packages:
      - base-files
      - python3
2.3. Building Both Images
In each of the directories above, run the build command:
rockcraft pack
Step 3: Importing, Running, and Comparing the Images
3.1. Importing into Docker
Use skopeo (integrated with rockcraft) to import the built .rock images into the local Docker daemon.
# Import the "chiselled" image
rockcraft.skopeo copy oci-archive:../python-chiselled/python-chiselled_3.12_amd64.rock docker-daemon:python-chiselled:3.12

# Import the "traditional" image
rockcraft.skopeo copy oci-archive:../python-fat/python-fat_3.12_amd64.rock docker-daemon:python-fat:3.12
3.2. Comparing Size and Content
Compare the size of both images:
docker images "python-*"
The difference will be striking: ~14MB for the chiselled image compared to ~125MB for the traditional one.
Step 4: Pushing the Chiselled Image to VMware Harbor
Now, I will deploy the better, more secure solution to my central registry.
4.1. Configuring Access to the Private Registry (The Secure Method with a Certificate)
For Docker to securely communicate with your private Harbor registry via HTTPS, it must trust the certificate that secures the Harbor registry. Instead of marking the registry as “insecure,” I will instruct Docker to trust the root certificate (CA) that signed your Harbor’s certificate.
Requirements:
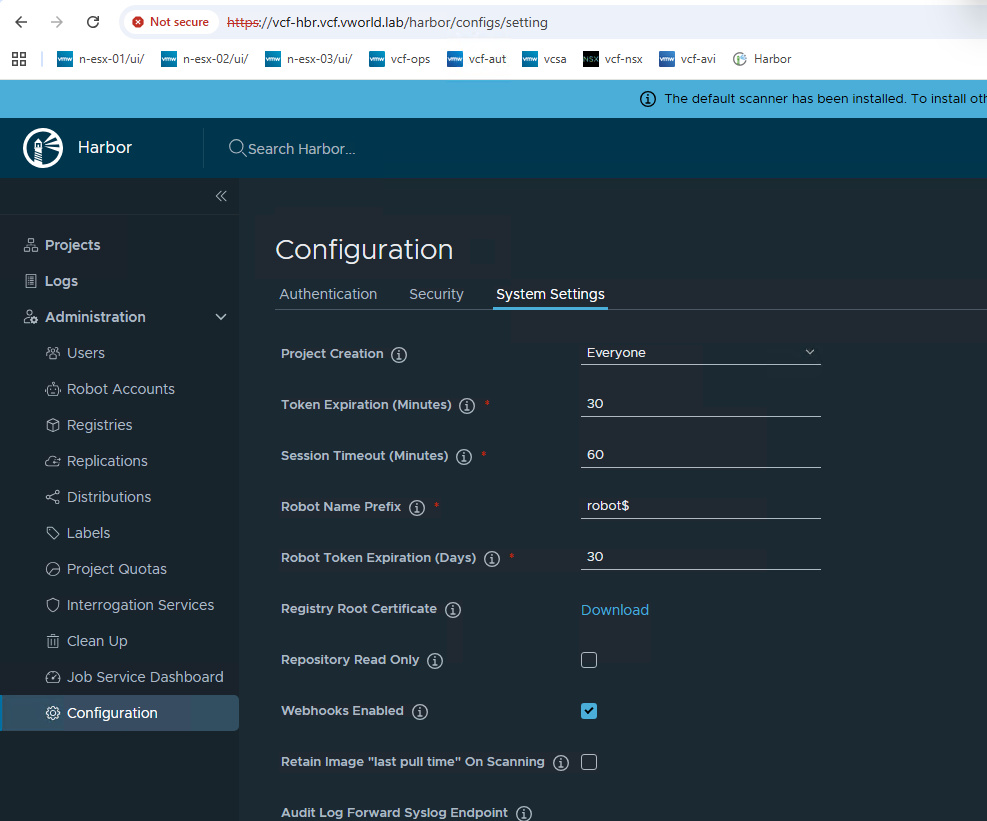
You need the Harbor instance’s root CA certificate. As shown in the screenshot you provided, this can be downloaded directly from the Harbor user interface.
Step 1: Download the Registry Root Certificate from Harbor
- Log in to your Harbor UI with an administrator account.
- In the left-hand navigation pane, go to Administration -> Configuration.
- Ensure you are on the System Settings tab.
- Locate the Registry Root Certificate option.
- Click the Download link to save the certificate file. It will likely be named
ca.crt.
This is the certificate that your Docker client needs to trust.
Step 1: Create a dedicated directory for the Harbor certificate
Docker automatically looks for certificates in directories whose names match the registry’s hostname.
sudo mkdir -p /etc/docker/certs.d/vcf-hbr.vcf.vworld.lab
- Explanation: The directory name
vcf-hbr.vcf.vworld.labmust exactly match your Harbor registry’s address.
Step 2: Copy the CA certificate to the created directory
Copy the CA certificate file into the newly created folder. Docker will automatically recognize it when attempting to connect.
sudo cp ca.crt /etc/docker/certs.d/vcf-hbr.vcf.vworld.lab/ca.crt
Step 3: Restart the Docker service
For Docker to load the new certificate configuration, you must restart its service.
sudo systemctl restart docker
After completing these steps, the Docker daemon will trust your Harbor registry. The connection will be fully encrypted and verified.
4.2. Tagging, Authenticating, and Pushing
Now that the connection is trusted, the rest of the process remains the same.
# 1. Tag the image to match the registry's naming scheme
docker tag python-chiselled:3.12 vcf-hbr.vcf.vworld.lab/library/python-chiselled:3.12

# 2. Log in to the Harbor registry
docker login vcf-hbr.vcf.vworld.lab

# 3. Push the image
docker push vcf-hbr.vcf.vworld.lab/library/python-chiselled:3.12
4.3. Harbor View: A Side-by-Side Comparison
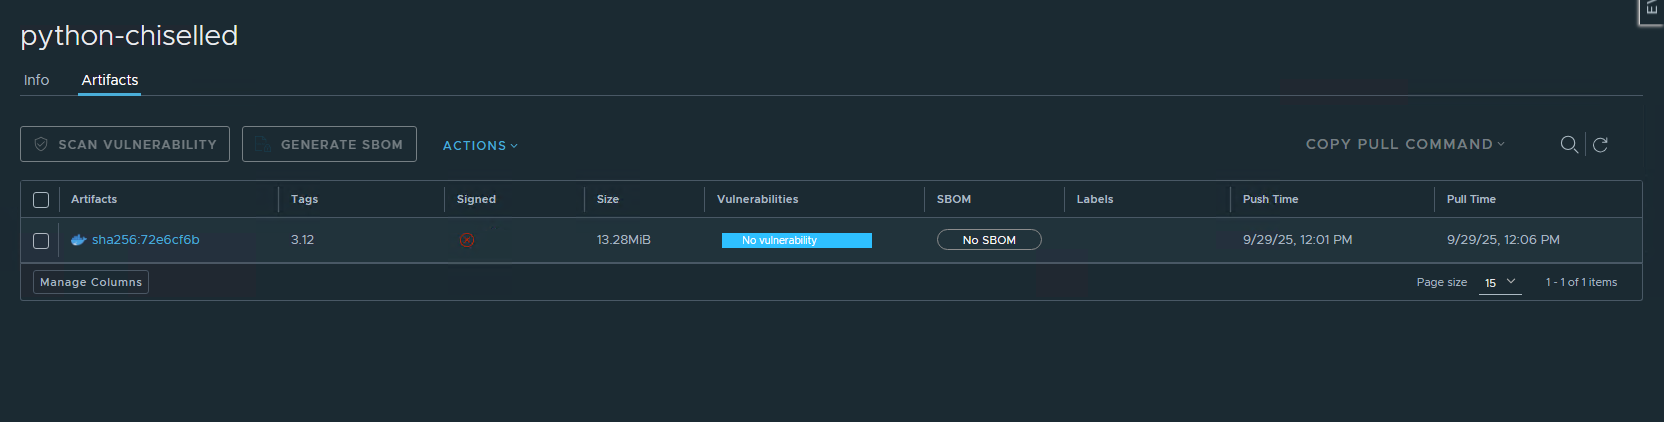
After pushing the python-chiselled image, I did the same for the traditional python-fat (shown as python-full in the Harbor UI) image so I could compare them directly within the VMware Harbor registry. The results are a powerful demonstration of the benefits of chiselled images.
Looking at the artifacts in Harbor, the differences are immediately clear, just as the provided screenshots illustrate:
The Chiselled Image (python-chiselled):
- Size: 13.29MB.
- Vulnerabilities: A clean slate with
No vulnerability. This is the direct result of including only the bare minimum runtime components, eliminating shells, package managers, and other common sources of CVEs.
The Traditional Image (python-full):
- Size: 44.03MB—over three times larger than its chiselled counterpart.
- Vulnerabilities: The scanner immediately flags
12 Totalvulnerabilities, with1of them being fixable. These vulnerabilities exist in the additional packages and system utilities included in a standard image, but are not necessary for my Python application to run.
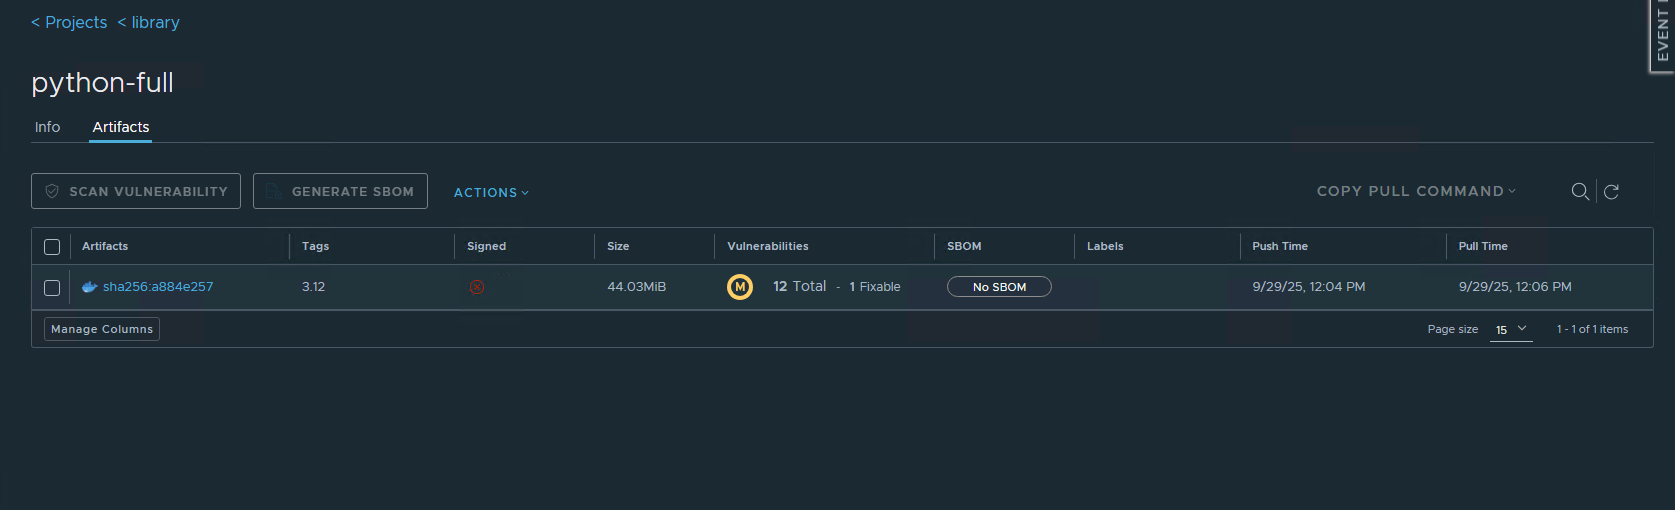
This side-by-side view in Harbor provides the ultimate proof. The chiselled image is not just an exercise in minimalism; it’s a direct and effective security strategy. By drastically reducing the image size and attack surface, I have produced an artifact that is faster to pull, cheaper to store, and, most importantly, verifiably more secure right out of the box, with zero CVEs detected by Harbor’s scanner.
Step 5: Using the Image in a Kubernetes Cluster (Tanzu) — The Realistic Version
My secure image is now in the registry. It’s time to run it as an application on a vSphere-integrated Kubernetes cluster. This section accounts for the realities of production-grade, secured clusters that often enforce strict security policies.
5.1. Configuring Cluster Access to the Harbor Registry
The Kubernetes cluster needs to know how to authenticate with Harbor to pull the image. For this, I will create a special Secret of type docker-registry.
kubectl create secret docker-registry harbor-cred \
  --docker-server=vcf-hbr.vcf.vworld.lab \
  --docker-username=YOUR_USERNAME \
  --docker-password=YOUR_PASSWORD
5.2. Defining the Deployment with Security Policies in Mind
Create a deployment.yaml file. The following definition is enhanced with crucial security contexts, which are necessary to run a Pod in a cluster with a restricted policy (commonly found in Tanzu).
apiVersion: apps/v1
kind: Deployment
metadata:
  name: python-chiselled-app
spec:
  replicas: 1
  selector:
    matchLabels:
      app: python-chiselled
  template:
    metadata:
      labels:
        app: python-chiselled
    spec:
      securityContext:
        runAsUser: 1001
        runAsGroup: 1001
        fsGroup: 1001
      imagePullSecrets:
      - name: harbor-cred
      containers:
      - name: python-app
        image: vcf-hbr.vcf.vworld.lab/library/python-chiselled:3.12
        command: ["python3", "-c"]
        args:
        - |
          import time
          print("Hello from a Chiselled container running on Kubernetes!", flush=True)
          while True:
            time.sleep(60)
        securityContext:
          allowPrivilegeEscalation: false
          capabilities:
            drop:
            - "ALL"
          runAsNonRoot: true
          seccompProfile:
            type: "RuntimeDefault"
5.3. Deploying and Verifying the Application
Now, apply the manifest to create the deployment in the cluster:
kubectl apply -f deployment.yaml
Check the deployment status and ensure the Pod has started successfully:
kubectl get deployment python-chiselled-app

kubectl get pods -l app=python-chiselled

kubectl logs deployment/python-chiselled-app
In the logs, you should see the message: Hello from a Chiselled container running on Kubernetes!.
Conclusion
I have walked you through a complete, modern, and realistic CI/CD path: from code, through building, to secure storage and a final, successful deployment on a secured cluster. This practical exercise proves that Chiselled images are not just a theory but a powerful, practical tool. Thanks to the VMware and Canonical partnership, integrating this technology with the VCF and Tanzu ecosystem is simple and seamless, enabling the creation of applications that are inherently more secure, lightweight, and ready to run at private cloud scale.