Welcome back to my series on building a lab based on VMware Cloud Foundation 9.0! In the previous articles, I went through the VCF 9.0 installation process, the configuration of the pfSense router, and the deployment of the NSX Edge cluster. Now that I have a solid foundation, it’s time for one of the most crucial steps: activating the Supervisor.
The Supervisor is a platform built into vSphere for running Kubernetes workloads, transforming the infrastructure into a modern environment ready for containerized applications. In VCF 9.0, this process has been significantly simplified thanks to its deep integration with NSX Virtual Private Clouds (VPC). This article will present the entire activation process, with a detailed explanation of the network architecture and key configuration aspects.
Prerequisites
Before beginning, it is necessary to ensure the environment meets all the requirements. Based on the previous steps, I should have:
- A running VMware Cloud Foundation 9.0 instance.
- A deployed and configured NSX Manager.
- A running NSX Edge cluster (
vcf-edge-cl) along with a Tier-0 Gateway (vcf-edge-gw) in Active-Standby mode. Deployment details can be found in the [previous article].- Important Note: In the previous article on deploying the edge cluster, I used
Mediumsized VMs. However, as the official documentation states, the Supervisor requires an Edge cluster inLargesize. If a smaller size was deployed, it will need to be reconfigured or a new, larger cluster must be deployed before activating the Supervisor. This is critical to ensure adequate performance and resources for network services like the Load Balancer.
- Important Note: In the previous article on deploying the edge cluster, I used
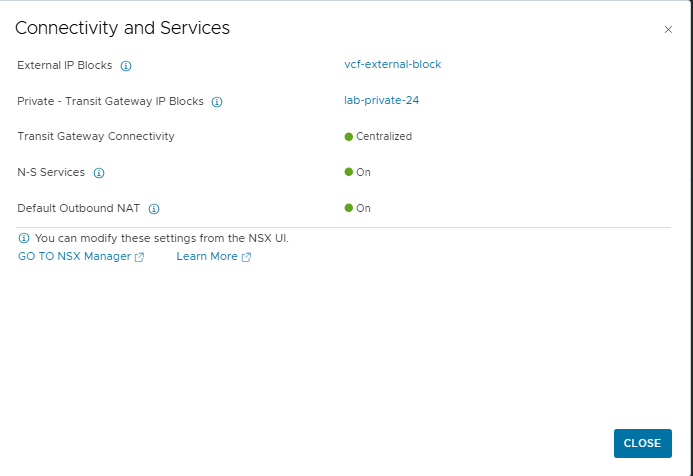
- IP Blocks defined in NSX Manager. For the Supervisor and its workloads, the following are essential:
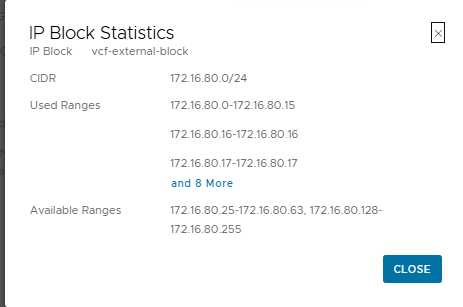
- External IP Blocks: A pool of public IP addresses for services (e.g., NAT, Load Balancer). In my lab, this is
vcf-external-blockwith the CIDR172.16.80.0/24. - Private – Transit Gateway IP Blocks: A pool of private IP addresses for connectivity between VPCs. I am using
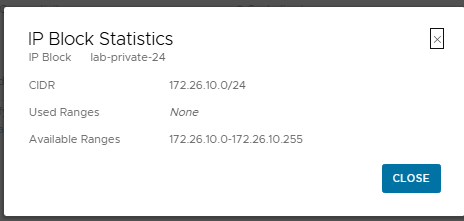
lab-private-24with the CIDR172.26.10.0/24.
- External IP Blocks: A pool of public IP addresses for services (e.g., NAT, Load Balancer). In my lab, this is
The Key Challenge in a Nested Environment: NAT and URPF
Before launching the wizard, an important detail specific to lab environments with nested virtualization and NAT needs to be addressed.
What is URPF?
Unicast Reverse Path Forwarding (URPF) is a security mechanism that verifies if a packet arriving on a network interface comes from a source address that is reachable through that same interface. In Strict mode, if the return path to the packet’s source leads through a different interface, the packet is dropped. This is intended to prevent IP spoofing attacks.
Why is this a problem in my lab?
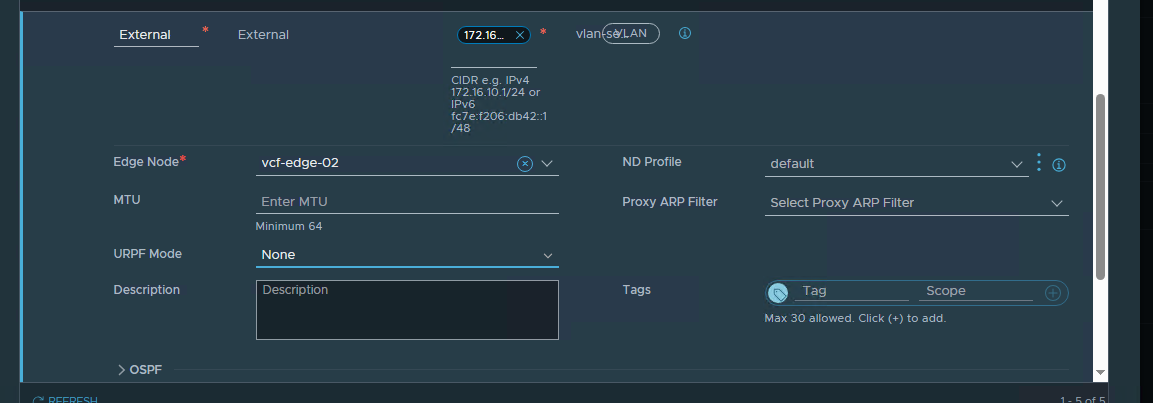
In my scenario, the pfSense router performs Network Address Translation (NAT) for all outbound traffic to the external network. When the Supervisor (or a VM on its management network, e.g., 172.16.80.66) tries to connect to the internet, its traffic is NAT-ed by pfSense. The return traffic is directed to the external address of pfSense and, after being “de-NAT-ed,” arrives at the T0 Gateway in NSX. From the T0 Gateway’s perspective, a packet originating from a public IP address on the internet is arriving on its internal interface. The default URPF configuration in Strict mode would drop such a packet because the route to that public IP address leads through the external (uplink) interface, not the internal one.
The Solution:
To enable communication in my nested lab, I must disable URPF on the T0 Gateway interface connected to the management network. In a production environment, this action would require a deeper security analysis, but in a lab, it is an acceptable and necessary step.
Preparatory Step: Creating a Virtual Private Cloud (VPC)
Although the Supervisor wizard can create its own system VPCs, it is good practice to prepare a dedicated VPC for future workloads. This logical network space is where applications and Kubernetes clusters will run.
- In the vSphere Client, navigate to the
Virtual Private Cloudsview. - Then, right-click on
Virtual Private Cloudsand select New VPC….
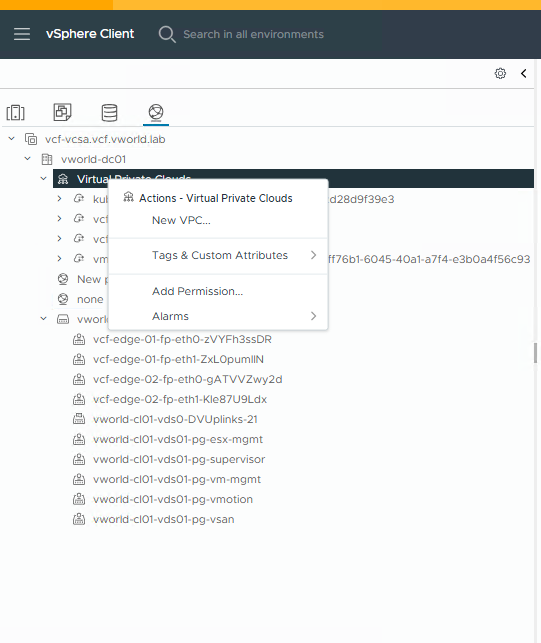
- In the
New Virtual Private Cloudwindow, the basic information should be filled in:- Name:
vcf-vpc-lab02 - Description: (Optional) A description can be added.
- Private – VPC IP CIDRs:
10.20.0.0/24. This is the main, private address space for virtual machines and pods inside this VPC.
- Name:

- After clicking
VIEW DETAILSunderConnectivity and Services, it can be seen that the VPC automatically inherits the configuration from the project’s connectivity profile, including the external IP pool (vcf-external-block) and the transit gateway pool (lab-private-24).
- After creating the VPC, a subnet must be added to serve as the management network for the Supervisor. The key element here is to create a public subnet. This is a requirement because the Supervisor’s control plane VMs must be able to communicate with external components (e.g., vCenter, image repositories). A private network would not be sufficient in this case.
- Name:
vcf-super-public - Access Mode: Public (This is required)
- Auto allocate Subnet CIDR from IP Blocks: Yes (NSX will automatically assign a network segment)
- Subnet size: 64 (meaning NSX will carve out a /26 subnet from the
vcf-external-blockpool)
- Name:

With the network for future workloads prepared, it is possible to proceed with the actual Supervisor activation.
Activating the Supervisor – Step by Step
With the environment prepared, I can now proceed with the Supervisor activation wizard in the vSphere Client.
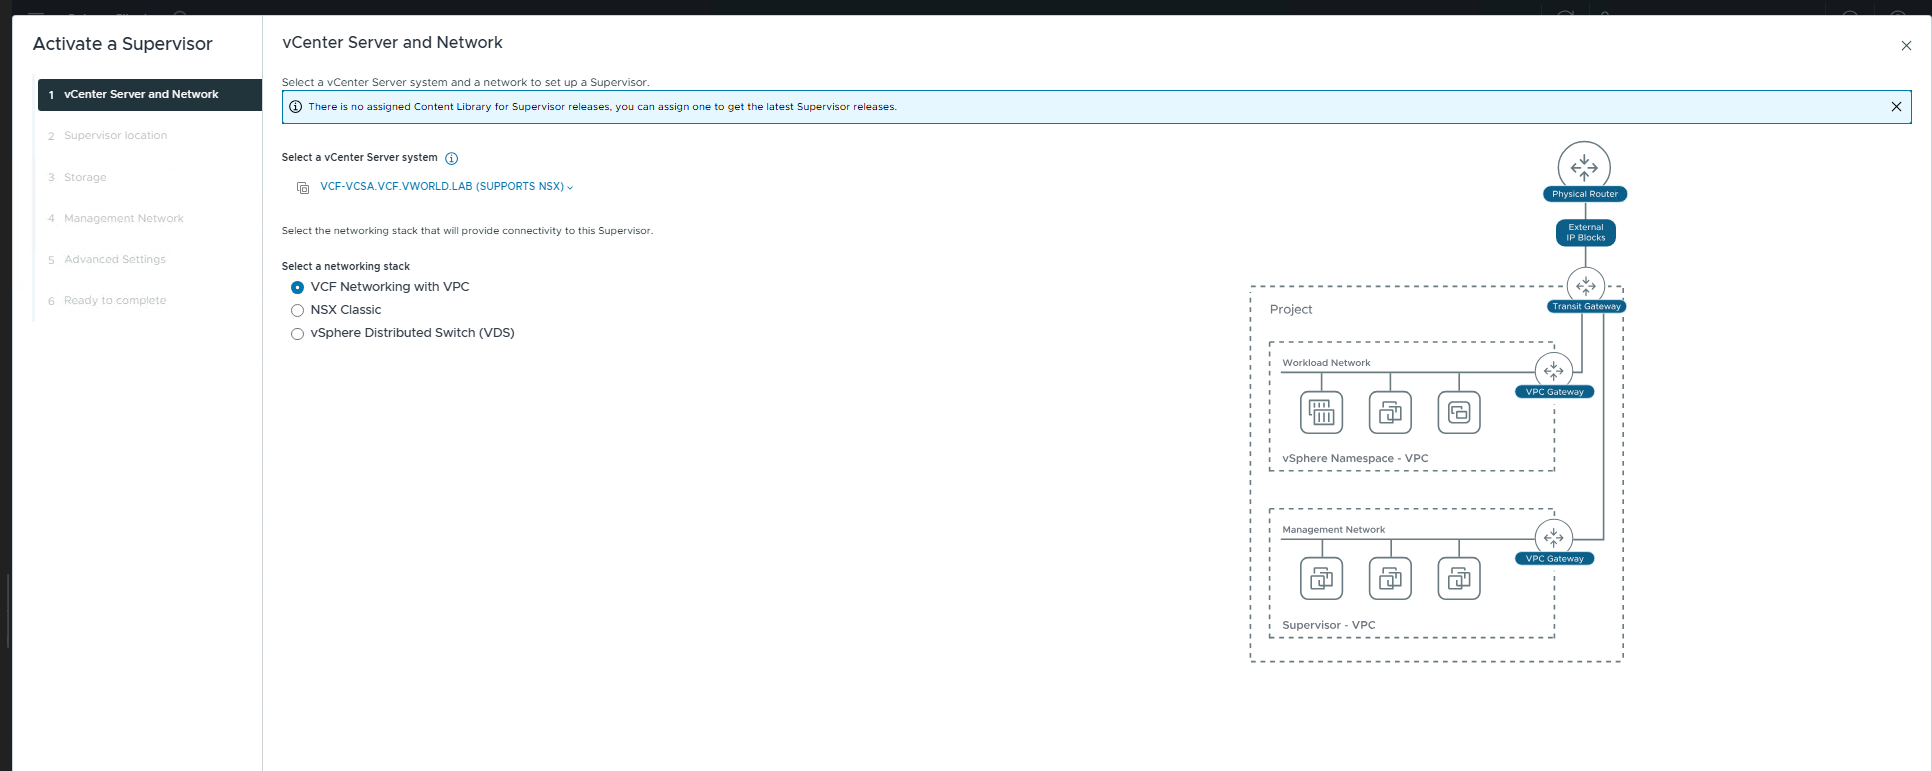
Step 1: Select vCenter and Network Stack
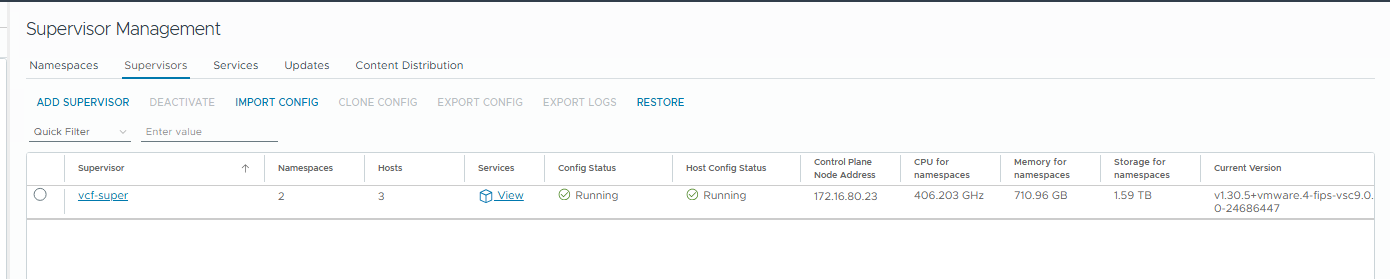
Navigate to Menu > Supervisor Management and click ADD SUPERVISOR (or Get Started).
- The selected vCenter is
vcf-vcsa.vcf.vworld.lab. - For the network stack, VCF Networking with VPC should be chosen. This is the default and recommended option in VCF 9.0, which automates network creation for workloads.
Step 2: Supervisor Location and Name
- Supervisor Name: The assigned name is
vcf-super. - vSphere Zone Selection: The data center and the vSphere Zone that will host the Supervisor’s management plane must be selected. In my case, this is
domain-cl0. VCF allows for multi-zone deployments for high availability, but for a lab, I am starting with a single zone.

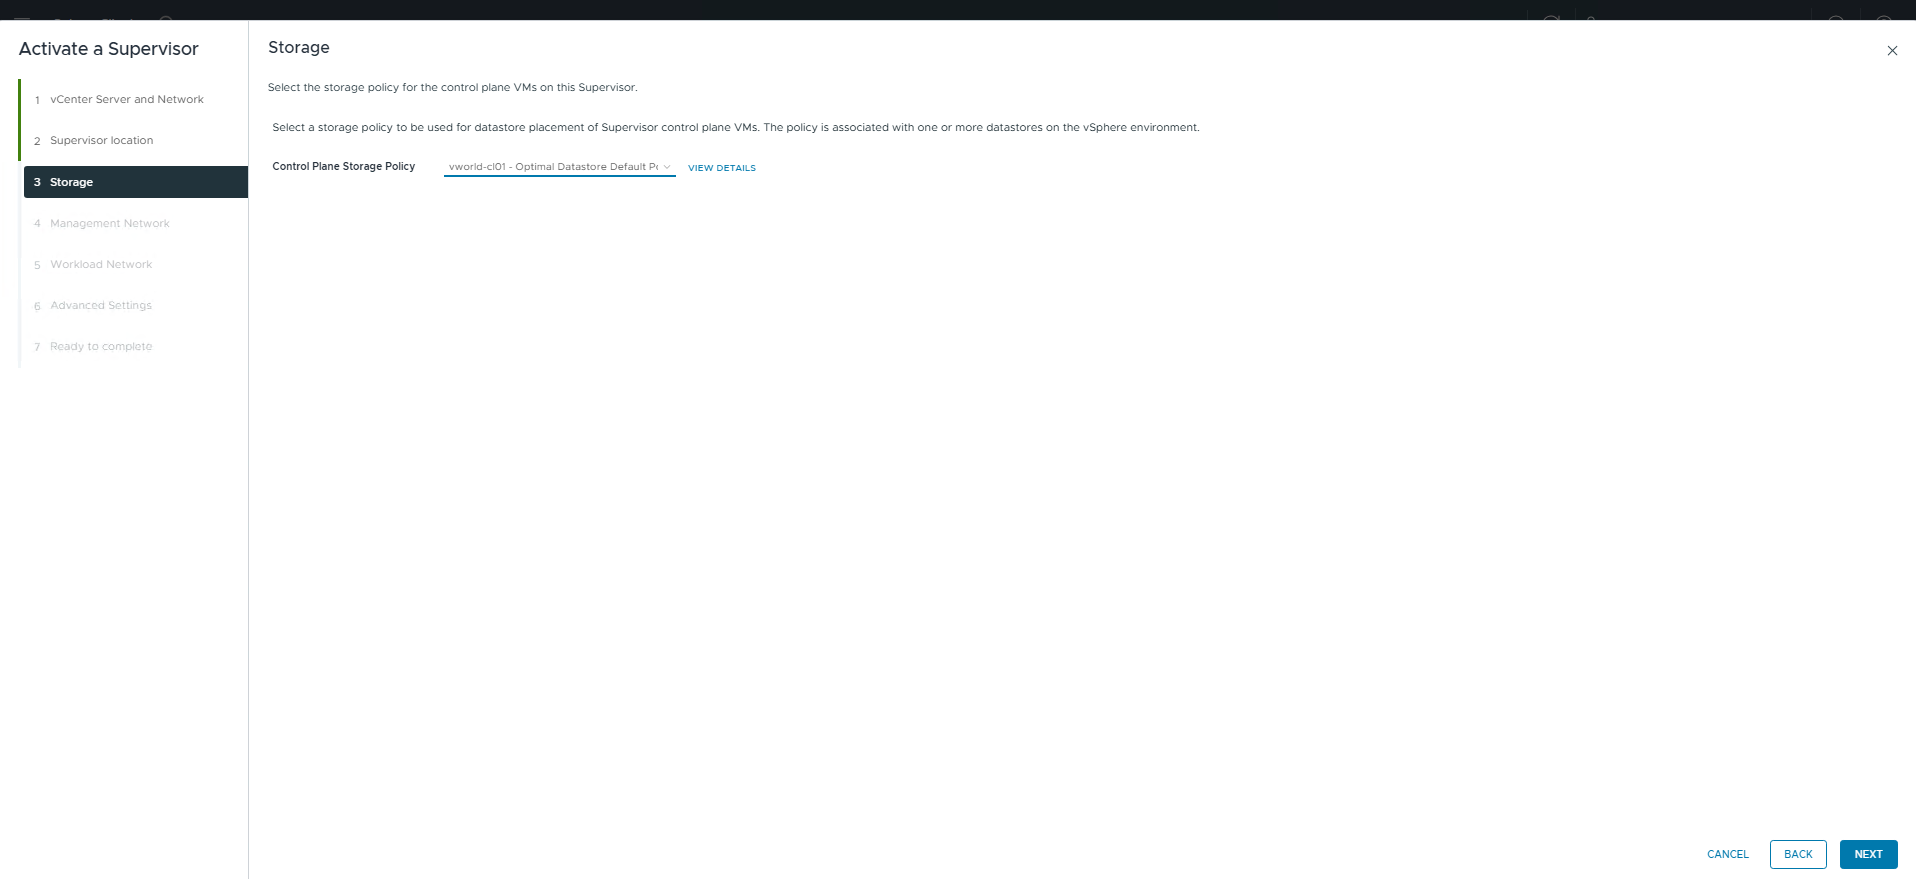
Step 3: Select a Storage Policy
The chosen storage policy for the Supervisor control plane VMs is the default policy for vSAN: vworld-cl01 - Optimal Datastore Default Policy - RAID1.
Step 4: Configure Networks (Management and Workload)
This is the most critical stage of the configuration. The Ready to complete screen provides a summary of all network settings.
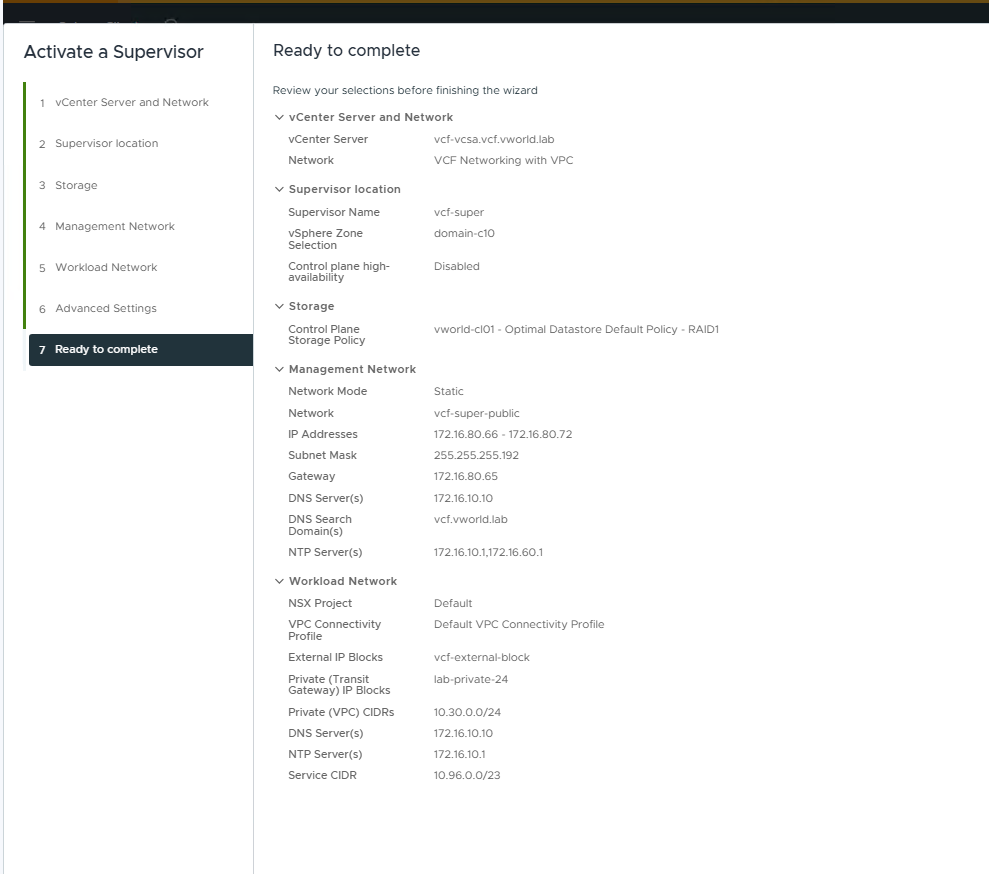
- Management Network:
- Network Mode: Static
- Network:
vcf-super-public(the public subnet created earlier in the VPC) - IP Addresses:
172.16.80.66 - 172.16.80.72(a pool of 5 addresses for 3 control plane VMs, 1 Floating IP, and 1 buffer for updates) - Subnet Mask:
255.255.255.192 - Gateway:
172.16.80.65 - DNS Server(s):
172.16.10.10 - NTP Server(s):
172.16.10.1,172.16.60.1
- Workload Network:
- NSX Project:
Default - VPC Connectivity Profile:
Default VPC Connectivity Profile - External IP Blocks:
vcf-external-block - Private (Transit Gateway) IP Blocks:
lab-private-24 - Private (VPC) CIDRs:
10.30.0.0/24(Private address space for workloads inside the VPC) - Service CIDR:
10.96.0.0/23(Internal network for Kubernetes services) - DNS Server(s):
172.16.10.10
- NSX Project:
After verifying, Finish should be clicked. The deployment process will begin and may take several dozen minutes. Its status can be monitored in Supervisor Management. Upon successful completion, the status will show as Running.
What Happens ‘Under the Hood’? The NSX VPC Architecture
Activating the Supervisor is more than just launching a few virtual machines. It’s a powerful process that builds an advanced network architecture in NSX in the background.
1. Automatic Creation of VPCs for System Components
One of the key benefits of NSX VPC integration is automation and isolation. The Supervisor creates at least two dedicated VPCs for its system components:
kube-system-...-VPC: For core Kubernetes services.vmware-system-...-VPC: For VMware system services.
Each of these VPCs has its own gateway (VPC Gateway), ensuring complete isolation of system traffic from user workloads. This is perfectly visible in the NSX topology view.
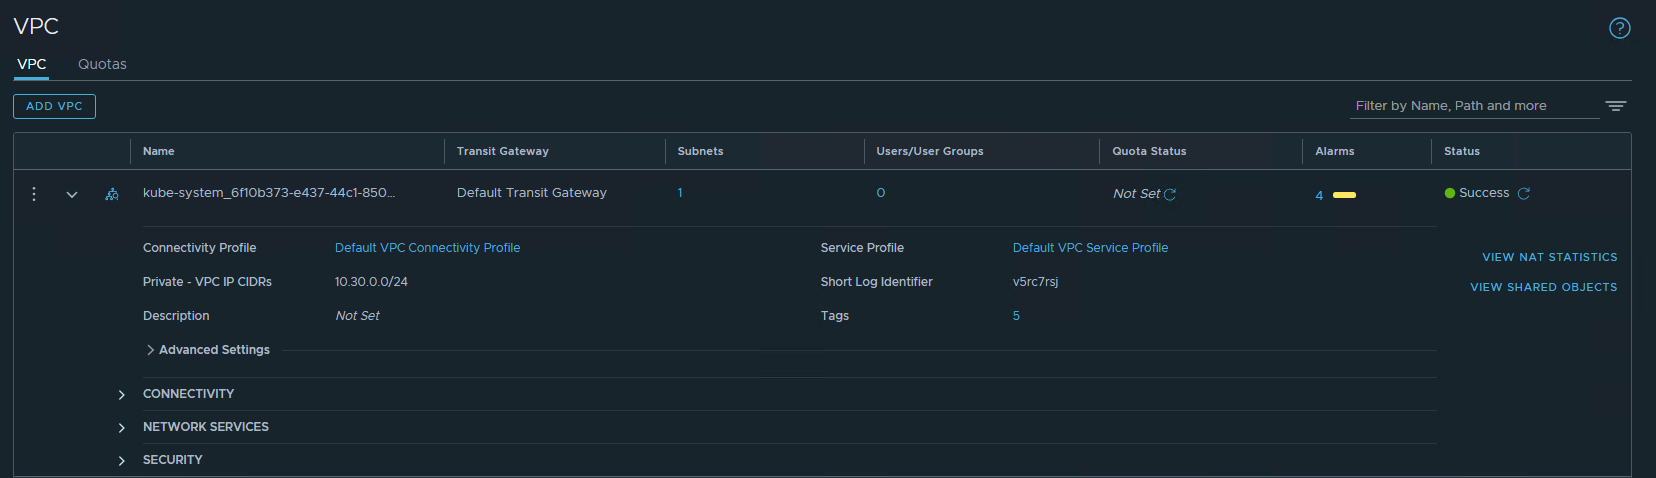
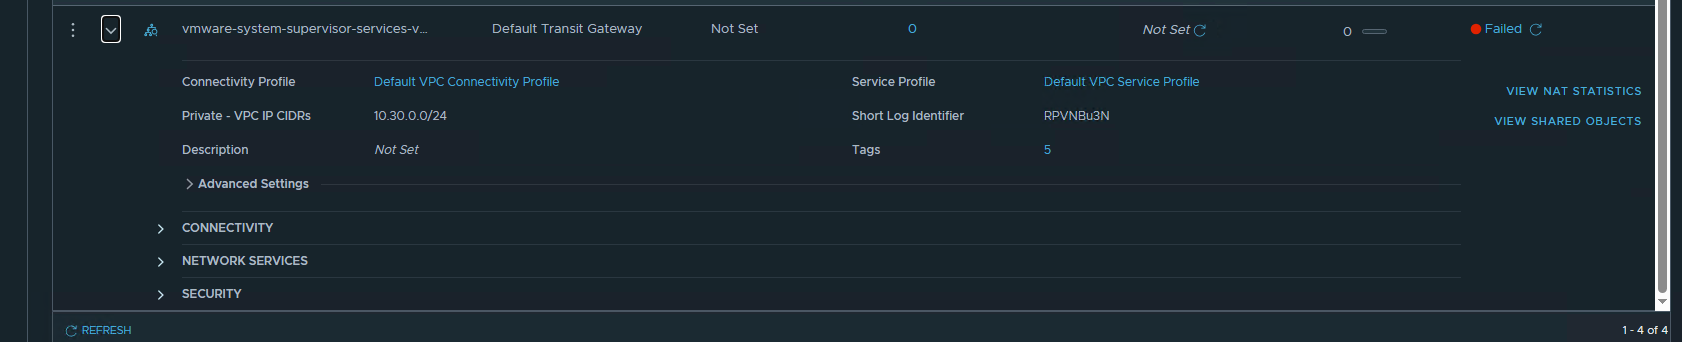
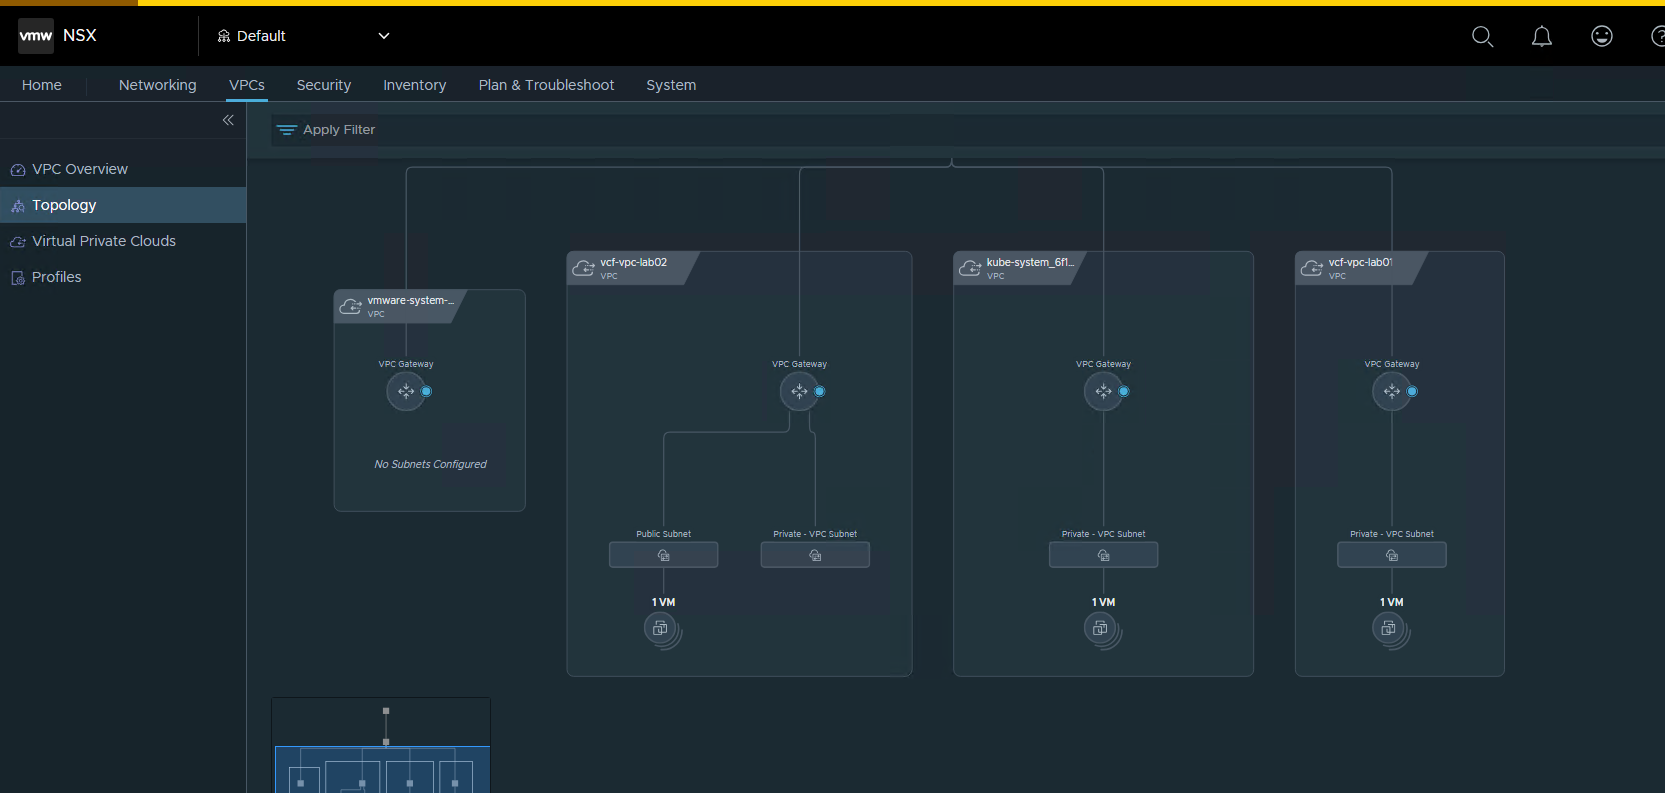
This separation is the foundation of a secure multi-tenant environment, where different teams or applications can operate in their own isolated networks without affecting each other or the core platform.
2. Deployment of a Distributed Load Balancer
NSX also automatically deploys a Distributed Load Balancer. Its tasks include:
- Providing high availability for the Supervisor’s API server (the control plane).
- Exposing
LoadBalancertype services for applications running in Kubernetes clusters (VKS/TKG) to the outside world.

This allows developers to easily expose their applications using standard YAML manifests, while NSX handles the rest—IP address allocation and load balancing configuration.
Summary
I have successfully activated the Supervisor in my VCF 9.0 environment, leveraging the full potential of its integration with NSX VPC. I’ve walked through the entire process, from the requirements and the nuances of a nested environment (URPF) to preparing the workload network (VPC) and analyzing what happens “under the hood” in NSX.

Hi I dont cleary understend you made a new subnet vcf-super-public 10.10.0.X and then you used this network for IPs 172.16.80.66 – 172.16.80.72. How its works?
good catch, wrong screenshot, you need to setup IP address from public pool which you setup, firstly I’ve setup with 10.10.0.x and Ive destroy it and setup one more time with 172…. but not prepare correct screenshoot. If you setup 172…. eveything work automatically, If choose 10…. you need to add on your pfSense another NAT range
Okay thanks, and one more thing on the step 5 Workload Network, I cannot choose any VPC Connectivity Profile(there is no options). Do you know why?
Best,
probably you don’t have any profile created, for workload you need to have private
@szymon the reason why you can’t see the vpc profile in the worldload section is because all the tickboxes are not met. If you do not have a external connectivity profile and attached, along with the vpc profile with both public and transit networks mapped etc.. then the wizard will hide the vpc profile from you. Ensure all the aspects are done for it to be visible, if all the pieces are in place then that profile will show. I normally take the approach of public and transit network set up in ip block, external connection profile attached to tier 0 and also vpc profile pointing correctly with N/S services enabled and public/transit networks you built earlier mapped… then run the supervisor wizard.
Hey,
Really liked the blog post, was really approachable!
I did have a question though, Is it possible to run something like Calico or MetalLB in BGP mode seeing that the nodes are provisioned in the private VPC?
I’d try this myself but I dont have access to a VCF environment.