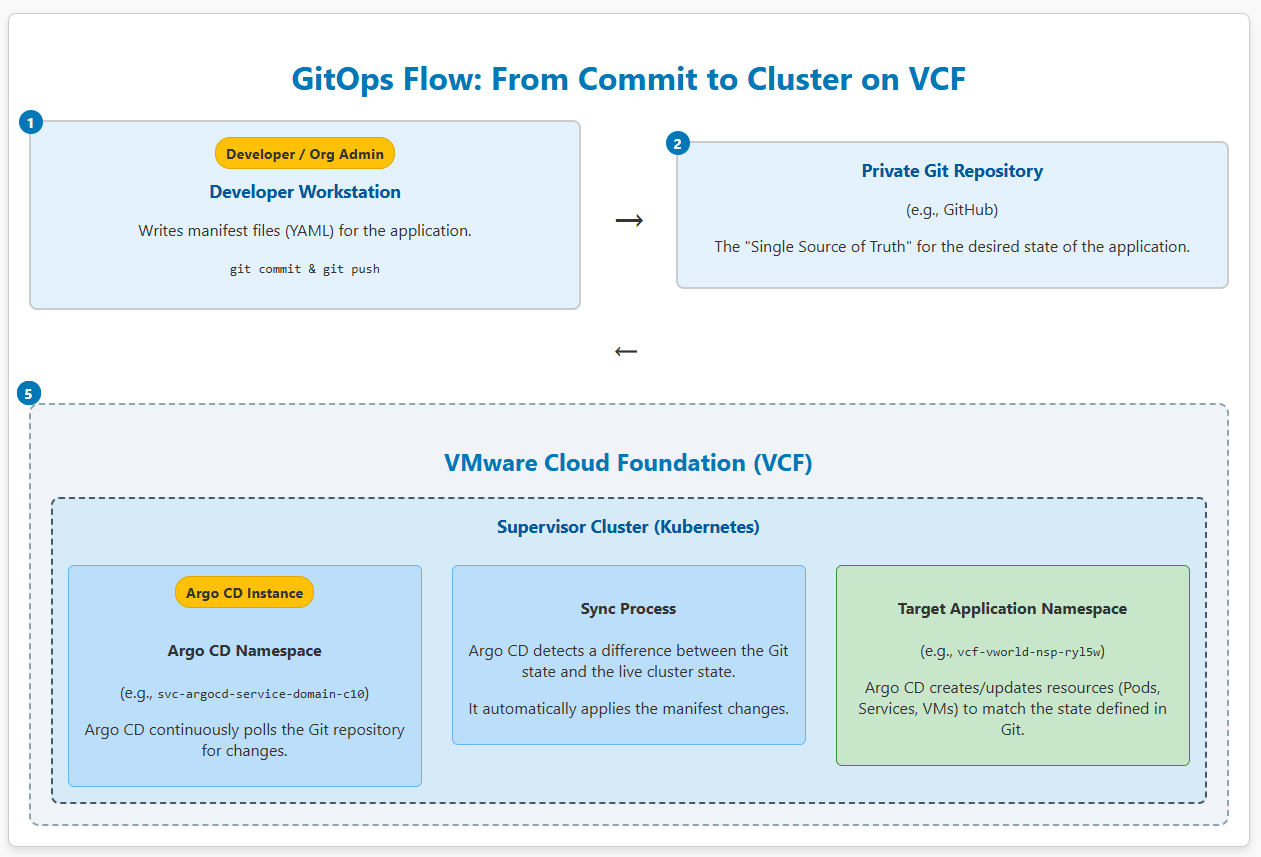
In today’s private cloud landscape, the game is no longer just about provisioning infrastructure on demand. The real challenge—and the most incredible opportunity—lies in building a seamless, automated bridge between that infrastructure and the applications that run on it. This is where the true power of VMware Cloud Foundation (VCF) comes to life, especially when I pair it with best-in-class GitOps tooling. By combining VCF Automation for self-service infrastructure with Argo CD for declarative application delivery, you can create a powerful, end-to-end ecosystem that is both robust and elegantly simple.
This guide is not just a high-level overview. It’s a step-by-step walkthrough that connects all the dots for you. I will take you on a journey from the initial platform setup by a Platform Admin, through the deployment and configuration of an Argo CD instance by an Organization Admin, all the way to deploying your first application from a private Git repository. By the end, you will have a fully functional GitOps pipeline that manages your infrastructure and applications-as-code as they should.
Prerequisites
Before you begin, ensure your environment meets the following requirements:
- A running VMware Cloud Foundation (VCF) instance with an activated and operational Supervisor Cluster.
- Access to the main vSphere Administrator account (e.g.,
administrator@vsphere.local) with the ability to SSH into the Supervisor Cluster Control Plane nodes. - A user account (I’ll use
admikin my examples) who is an Organization Admin in VCF Automation and has been assigned theeditrole for a vSphere Namespace. - A prepared vSphere Namespace: I’m assuming you have a namespace ready, something like
vcf-vworld-nsp-ryl5w. As an Organization Admin, you can easily create one in the VCF Automation UI, as I detailed in my previous article, “VCF Automation: From Zero to a Running Virtual Machine”. - CLI tools installed: Your workstation must have
kubectl, theargocdCLI installed and configured. - A private Git repository (e.g., on GitHub) to store your application manifests.
Part 1: Platform Preparation (Platform Admin Tasks)
These one-time steps must be performed by an administrator with full privileges over the VCF and vSphere environment. This is what I had my Platform Admin do to prepare the environment for me.
Step 1: Install the Argo CD Service on the Supervisor Cluster
Before users like me can deploy their own Argo CD instances, the Platform Admin must first make the “Argo CD Operator” available as a service on the Supervisor Cluster.
- Download the service definition from the Broadcom Support portal, ensuring the version is compatible with your VCF version.
Sample service yaml
apiVersion: data.packaging.carvel.dev/v1alpha1
kind: Package
metadata:
  creationTimestamp: null
  name: argocd-service.vsphere.vmware.com.1.0.1-24896502
spec:
  refName: argocd-service.vsphere.vmware.com
  releasedAt: "2025-05-08T08:32:37Z"
  template:
    spec:
      deploy:
      - kapp: {}
      fetch:
      - imgpkgBundle:
          image: projects.packages.broadcom.com/vsphere/supervisor/argocd-service/1.0.1/argocd-service:v1.0.1_vmware.1
      template:
      - ytt:
          paths:
          - config/sources
          - config/overlays
      - kbld:
          paths:
          - '-'
          - .imgpkg/images.yml
  valuesSchema:
    openAPIv3:
      additionalProperties: false
      properties:
        namespace:
          default: argocd-service
          description: argocd-service's namespace
          type: string
      type: object
  version: 1.0.1-24896502
---
apiVersion: data.packaging.carvel.dev/v1alpha1
kind: PackageMetadata
metadata:
  creationTimestamp: null
  name: argocd-service.vsphere.vmware.com
spec:
  displayName: ArgoCD Service
  longDescription: This service allows users to self-service ArgoCD instance in different namespaces.
  shortDescription: This service allows users to self-service ArgoCD instance in different namespaces.
- Install the service in the vSphere Client:
- Navigate to
Workload Management > Services. - On the
Supervisor Servicestab, clickAdd New Service. - Upload the downloaded YAML file containing the service definition.
- Once the service is added, select it from the list and use the
Install on Supervisorsaction to install the operator on your target Supervisor Cluster.
- Navigate to
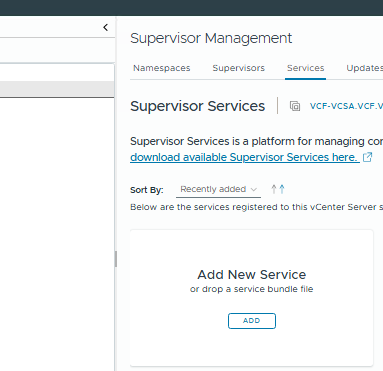
Step 2: Grant cluster-admin Privileges to the User
This is a critical step that resolves most potential permission issues during the Argo CD setup. For Argo CD to manage resources across the cluster, the user configuring it (in this case, me, admik) needs full Kubernetes cluster administrator privileges.
- Log in as
rootvia SSH to one of the Supervisor Cluster Control Plane nodes.
2. Execute the kubectl command directly on the node. The built-in kubectl client on the Control Plane node already has administrative privileges by default. The following command will grant my admik user the cluster-admin role.
kubectl create clusterrolebinding admik-cluster-admin-binding --clusterrole=cluster-admin --user=admikAfter this operation, my admik user becomes a full administrator of the Supervisor Cluster at the Kubernetes layer, which enables a seamless Argo CD configuration.
Part 2: Deploy and Configure Argo CD (My Tasks as an Organization Admin)
Now, as the admik user with my newly elevated privileges, I can proceed to deploy and configure my own Argo CD instance.
Step 3: Deploy the Argo CD Instance
Configure my local kubectl to connect to the Supervisor Cluster as the admik user
kubectl vsphere login --server=<SUPERVISOR_IP> --vsphere-username admik --insecure-skip-tls-verify


kubectl config use-context <SUPERVISOR_CONTEXT_NAME>
Create a manifest file my-argocd-instance.yaml. This file declares my intent to deploy an Argo CD instance into a dedicated namespace (e.g., svc-argocd-service-domain-c10).
apiVersion: argocd-service.vsphere.vmware.com/v1alpha1
kind: ArgoCD
metadata:
  # The name of my Argo CD instance
  name: my-first-argocd
  # The namespace where Argo CD components will be created
  namespace: svc-argocd-service-domain-c10
spec:
  # The version of Argo CD. Ensure it matches the installed service.
  version: "2.14.15+vmware.1-vks.1"
Apply the manifest to the cluster:
kubectl apply -f my-argocd-instance.yamlThe Argo CD Operator, which my Platform Admin installed in Step 1, will detect this resource and begin creating all necessary components (Pods, Services, etc.).

Step 4: Access and Secure Your Argo CD Instance
Find the Argo CD server’s IP address: The argocd-server service will be exposed with an external IP. I’ll find it with this command:
kubectl get service argocd-server -n svc-argocd-service-domain-c10I’ll note the address from the EXTERNAL-IP column. (same thing you can do on UI from Supervisor -> Namespace -> Network -> Services )
Retrieve the initial admin password:
kubectl -n svc-argocd-service-domain-c10 get secret argocd-initial-admin-secret -o jsonpath='{.data.password}' | base64 -dLog in and change the password (very important!):
- I’ll open a browser and navigate to the IP address I just obtained.
- I’ll log in using the username
adminand the copied password. - Then, I’ll use the
argocdCLI to immediately change the password to my own:
# Log in to the server via the CLI
argocd login <ARGO_IP_ADDRESS> --username admin --password <COPIED_PASSWORD> --insecure

# Update the password
argocd account update-password
Step 5: Add the Supervisor Cluster to Argo CD
I need to tell Argo CD where it should deploy applications. Thanks to my cluster-admin privileges, this process is straightforward.
Add the cluster, pointing to my target vSphere Namespace:
argocd cluster add <SUPERVISOR_CONTEXT_NAME> --namespace vcf-vworld-nsp-ryl5w Argo CD will automatically create the necessary ServiceAccount and RoleBinding to manage resources within the specified namespace.
Part 3: Deploying an Application from a Private Git Repository
This is the culminating moment where I’ll connect everything into a working GitOps pipeline.
Step 6: Configure Access to Your Private Git Repository
Argo CD needs to authenticate with your private Git repository to fetch application manifests securely.
HTTPS Access with a Personal Access Token (PAT)
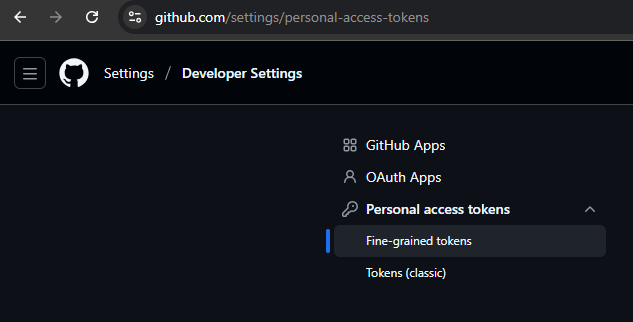
- Generate a Personal Access Token (PAT) on GitHub:
- Log in to your GitHub account.
- Go to
Settings > Developer settings > Personal access tokens > Tokens (classic). - Click
Generate new tokenand selectGenerate new token (classic). - Give the token a name (e.g.,
argocd-access-token). - Set an expiration date.
- Under
Select scopes, check only thereposcope (Full control of private repositories). - Click
Generate tokenand immediately copy the generated token. You will not be able to see it again.
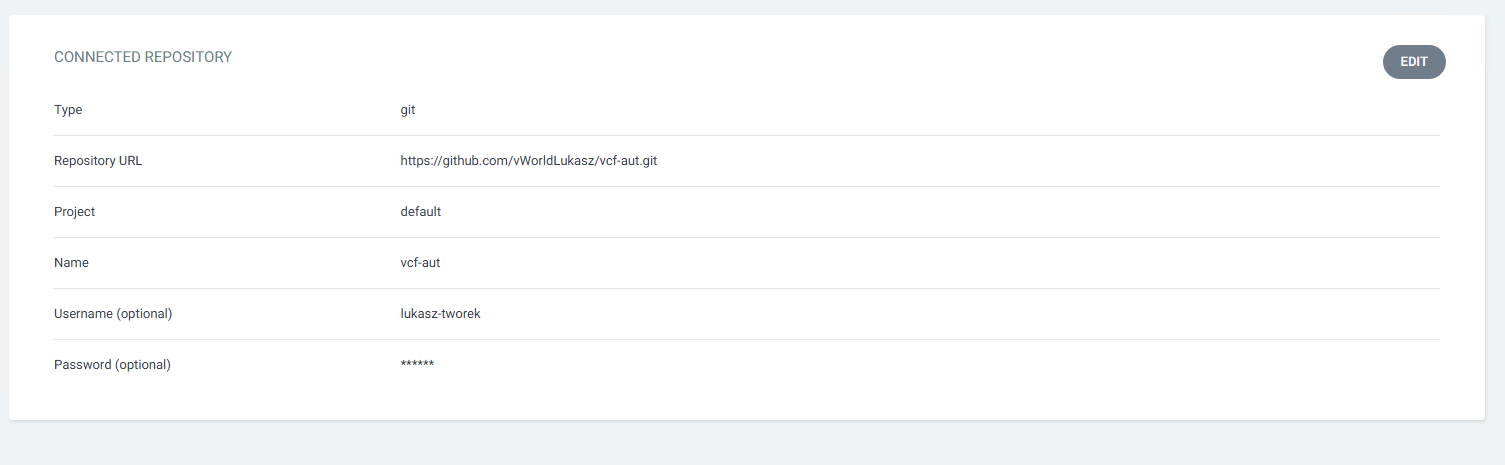
- Add the repository in the Argo CD UI:
- In the Argo CD web UI, go to
Settings > Repositories. - Click the
+ CONNECT REPObutton. The HTTPS connection form will open by default. - Fill out the form
- Type:
git - Repository URL: Enter your repository’s URL in HTTPS format, e.g.,
https://github.com/YourName/vcf-aut.git. - Username: Enter your GitHub username.
- Password: Paste the copied Personal Access Token (PAT) here.
- Type:
- Click
CONNECT. After a moment, the connection status should change toSuccessful.
- In the Argo CD web UI, go to
Step 7: Create and Deploy the Application
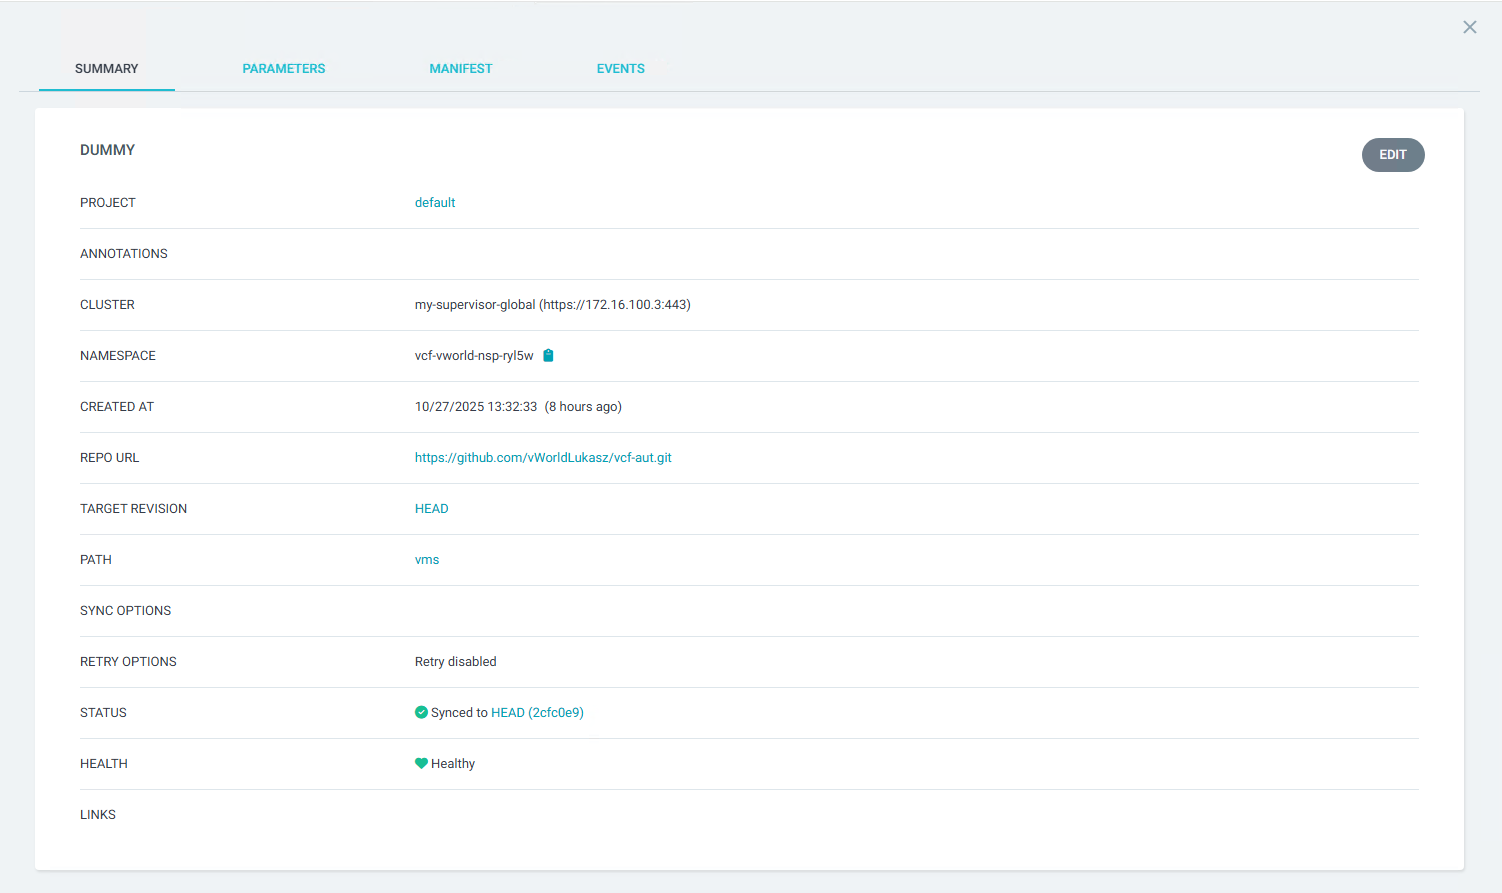
- In the Argo CD UI, I navigated to the
Applicationssection and clicked+ NEW APP. - I filled out the
GENERALsection:- Application Name:
dummy - Project Name:
default - SYNC POLICY: I selected
Automatic
- Application Name:
- I filled out the
SOURCEsection:- Repository URL: I selected my repository (added in the previous step) from the dropdown list.
- Revision:
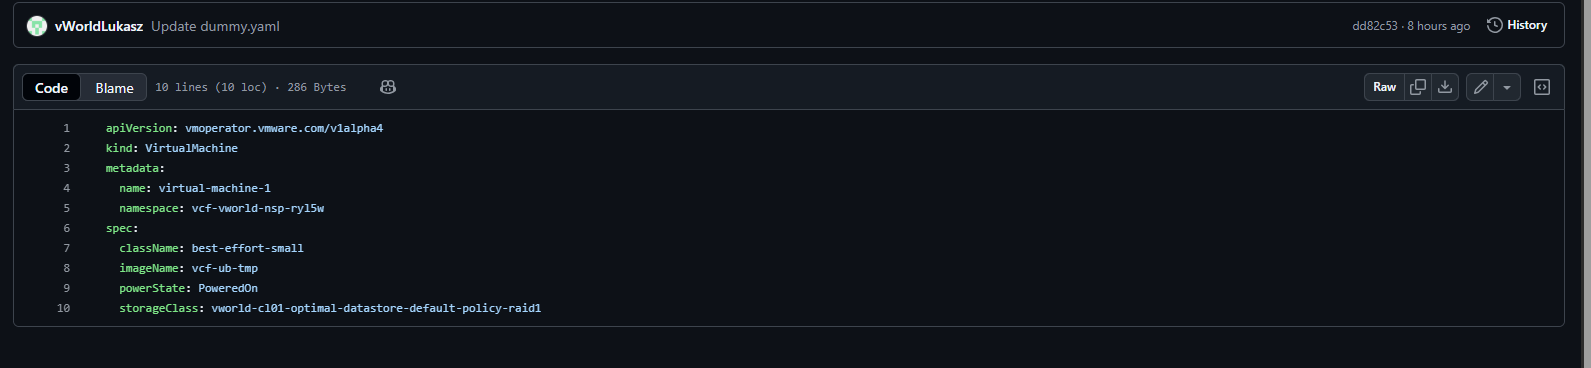
HEAD(to track the latest changes in the main branch). - Path: The path to the directory within my repository containing the Kubernetes manifests (e.g.,
vms, or.for the root directory).
- I filled out the
DESTINATIONsection:- Cluster URL: I selected
https://my-supervisor-global(https://172.16.100.3:443)from the list (this represents the cluster where Argo CD is running, i.e., the Supervisor Cluster). - Namespace: I entered the name of my target vSphere Namespace:
vcf-vworld-nsp-ryl5w.
- Cluster URL: I selected
- Finally, I clicked the
CREATEbutton in the top-left corner.
Step 8: Verification
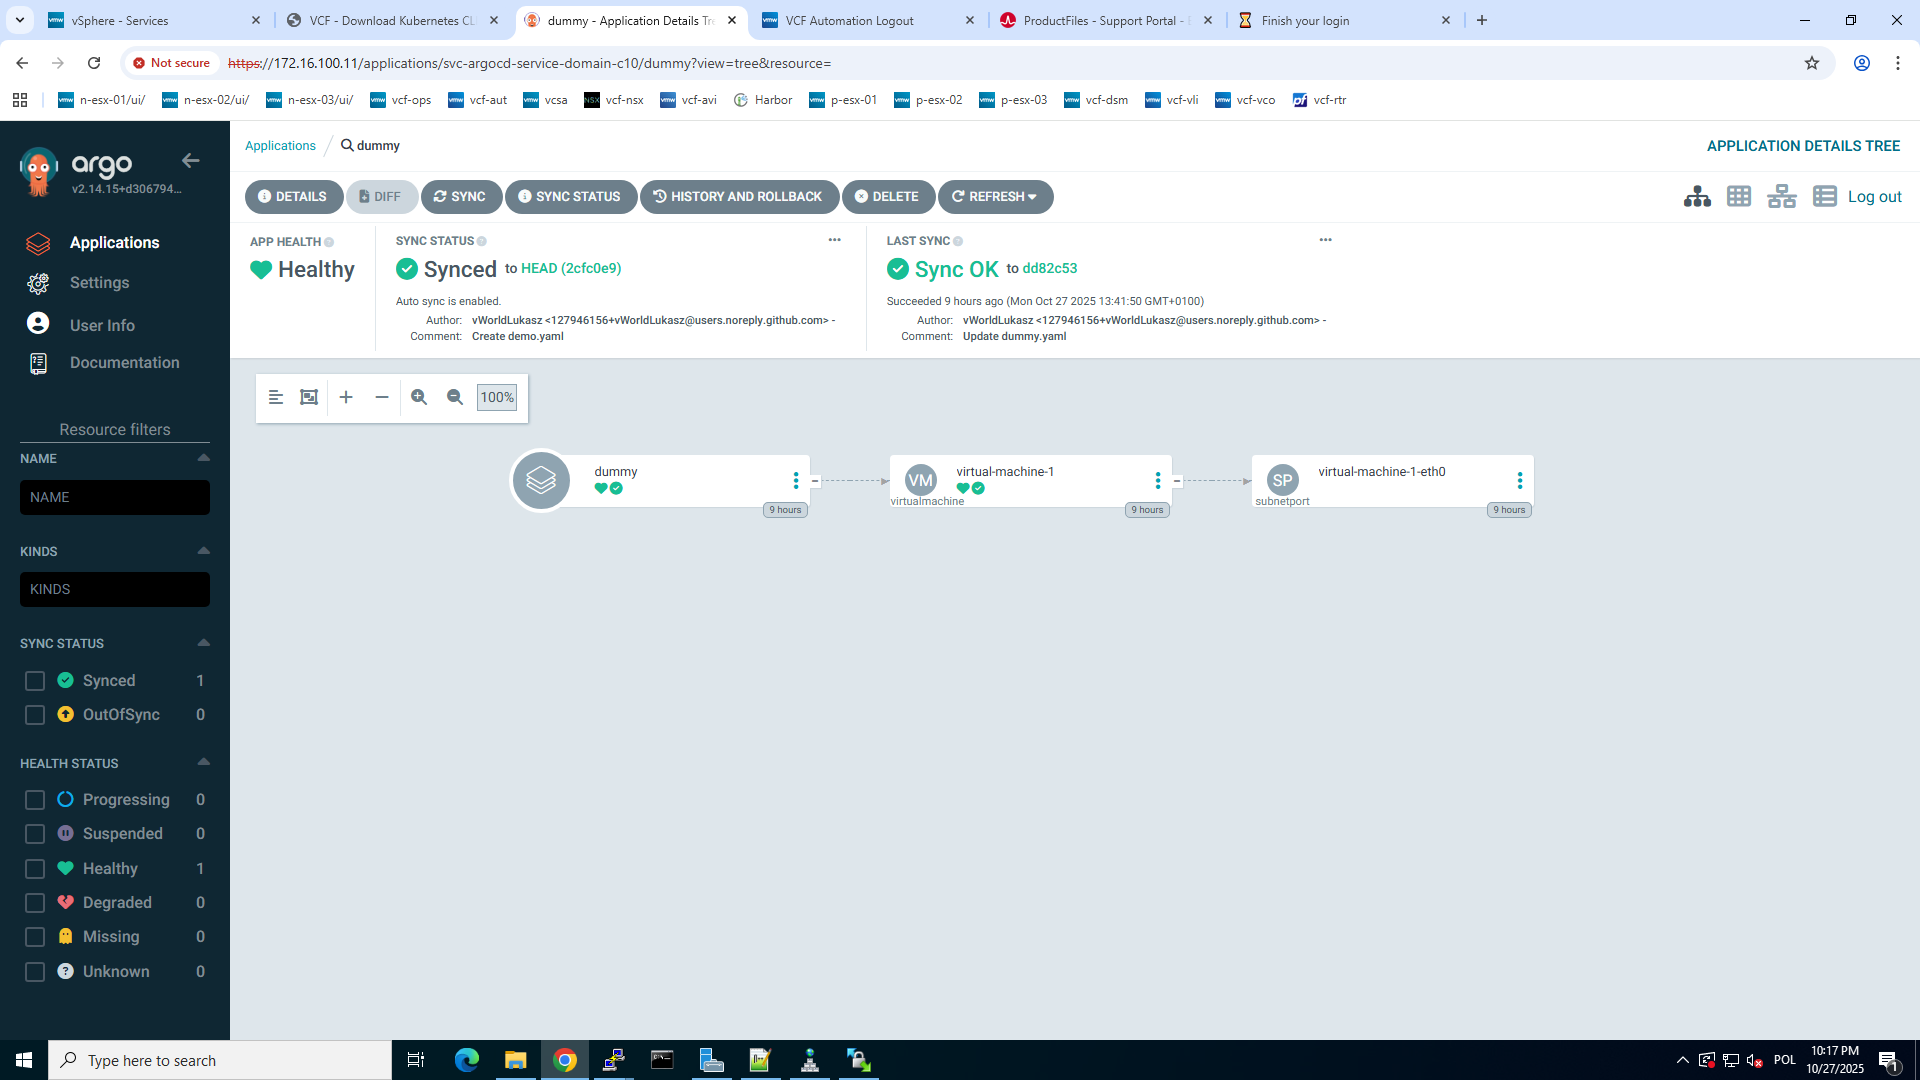
Once the application is created, Argo CD will immediately begin synchronizing.
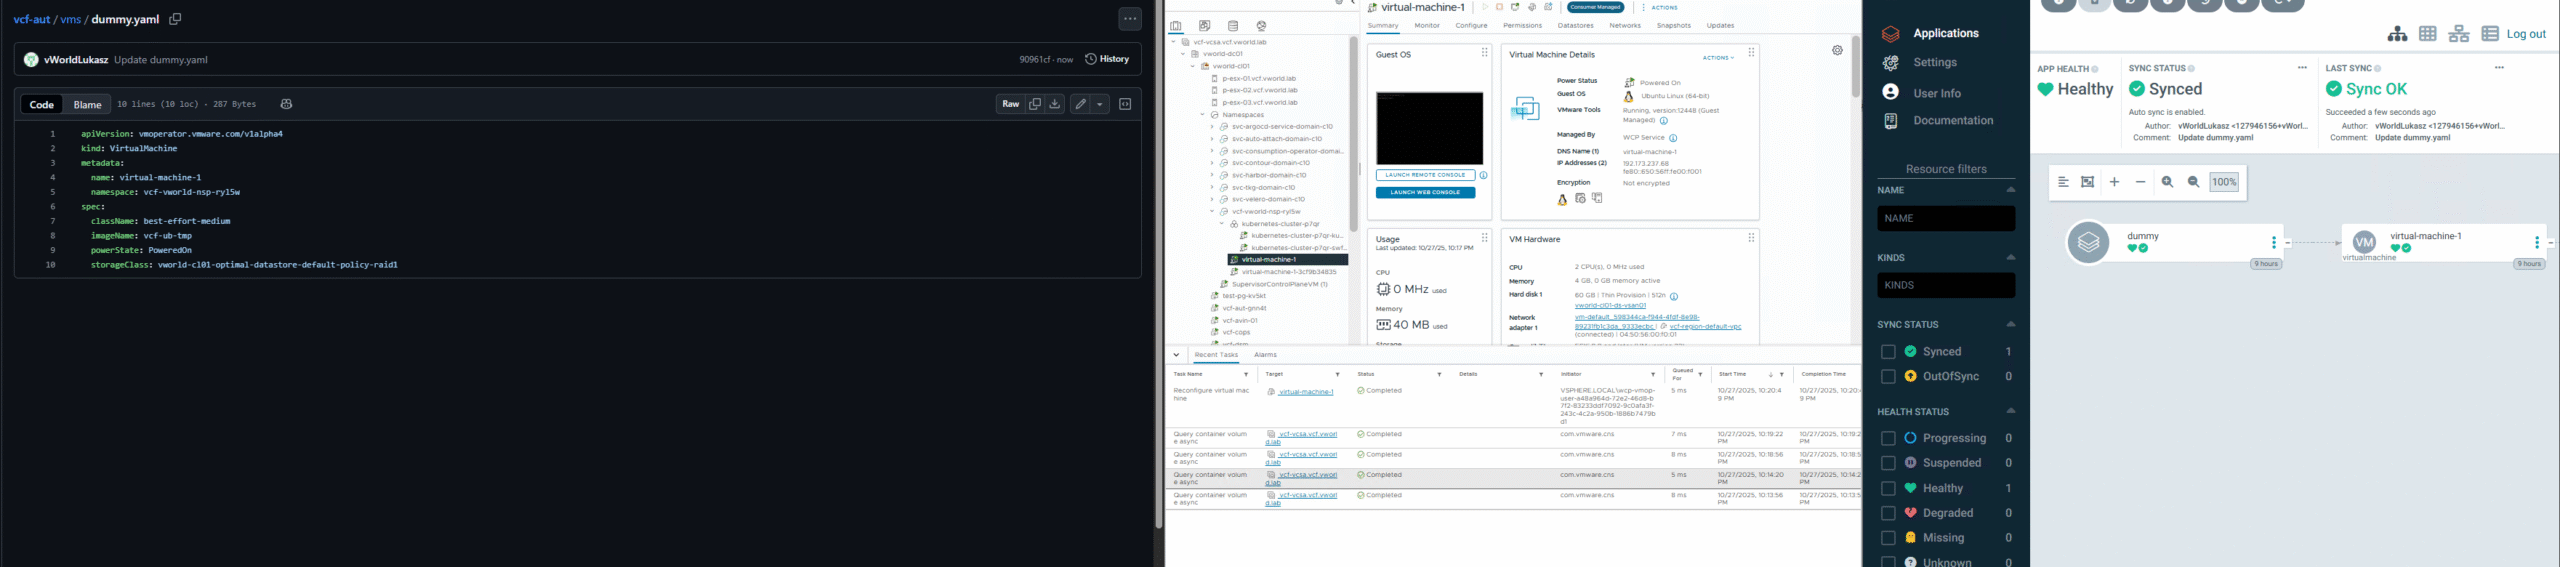
- In the Argo CD UI: I clicked on the
my-first-appapplication tile. I could see a graphical representation of my resources and watched as their status changed toHealthyandSynced. - In the vSphere Client: I logged in to vCenter, navigated to the
Workload Managementview, and then to myvcf-vworld-nsp-ryl5wnamespace. Under theWorkloadsandVMstabs, I saw the new objects (Pods, Services, Virtual Machines) that Argo CD automatically created from the manifests in my Git repository.

Summary
Congratulations! You have successfully configured a fully functional, secure, and automated GitOps pipeline on the VMware Cloud Foundation platform. Every change (commit) to the YAML files in your Git repository will now be automatically detected and deployed to your environment, ensuring consistency, repeatability, and velocity in your application delivery.
Appendix
code on git
after change automatically change VM on vcenter through supervisor and ArgoCD